Can You Upload an Svg and Resize It on Front End of Website
In this tutorial, I will prove you how to upload/shop images in MongoDB using Node.js & Limited with the assistance of multer & multer-gridfs-storage.
Related Posts:
– How to upload multiple files in Node.js
– Upload & resize multiple images in Node.js using Limited, Multer, Sharp
– Node.js Express File Upload Residue API (static binder) instance using Multer
– Google Cloud Storage with Node.js: File Upload example
More Practice:
– Node.js, Express & MongoDb: Build a CRUD Rest Api example
– Node.js + MongoDB: User Authentication & Authorization with JWT
Deployment: Docker Compose: Node.js Limited and MongoDB example
Contents
- Overview
- Node.js upload/store epitome in MongoDB
- Projection Structure
- Setup Node.js modules
- Create View for uploading image
- Configure MongoDB database
- Create middleware for uploading & storing image
- Create Controller for the view
- Create Controller for uploading Images
- Define routes
- Create Express app server
- Run & Check result
- Node.js upload/store multiple images in MongoDB
- Change grade for uploading multiple images
- Alter middleware for uploading & storing epitome
- Controller for uploading multiple images
- Run & Bank check issue
- Determination
- Farther Reading
- Source Code
Overview
Our Node.js Application volition provide APIs for:
- uploading Files/Images to MongoDB
- getting list of Files' information (file proper noun & url)
- downloading File/Image from server with the url
This is the UI:
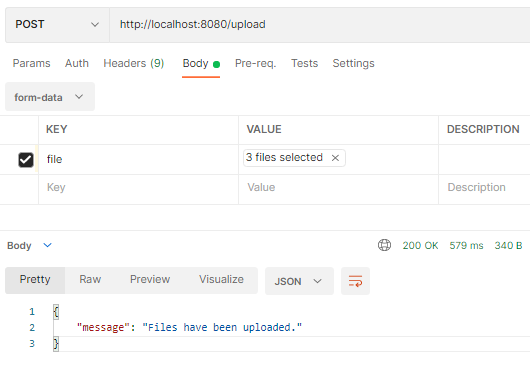
You lot can use an HTTP Customer for epitome upload:
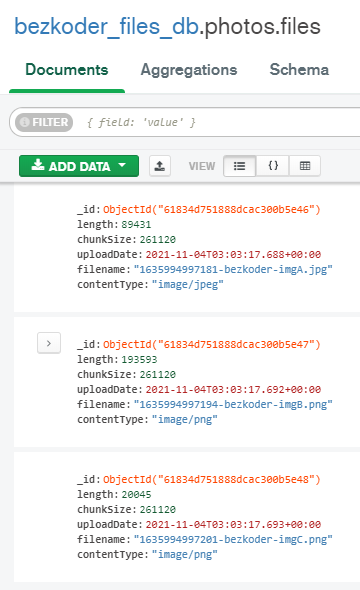
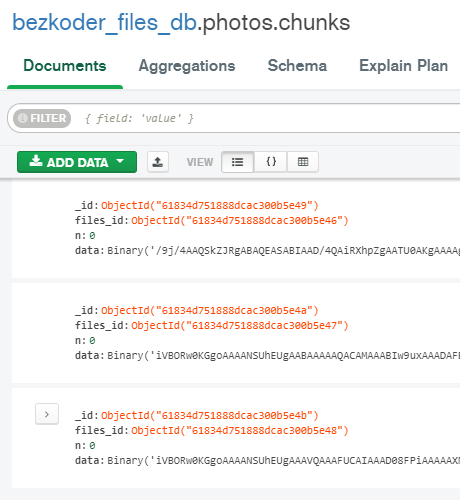
The images volition be stored in 2 collections: photo.files and photos.chunks.
If we get listing of image files, the Node.js Rest Apis will return:
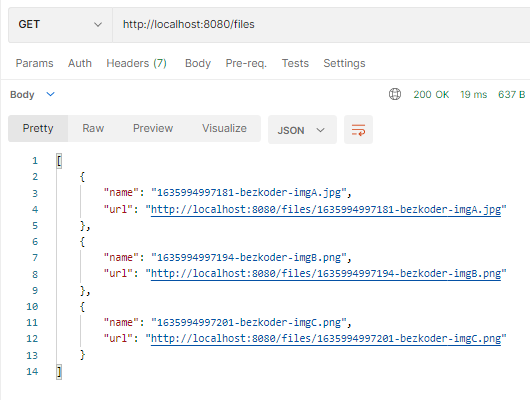
Each item in the response array has a url that yous can use for downloading the file/image.
These are APIs to be exported:
| Methods | Urls | Deportment |
|---|---|---|
| Postal service | /upload | upload a File/Prototype |
| GET | /files | get Listing of Images (name & url) |
| Become | /files/[filename] | download a File |
This Node.js App works with:
– Angular viii Client / Angular 10 Customer / Angular 11 Customer / Angular 12
– Angular Material 12
– Vue Client / Vuetify Customer
– React Customer / React Hooks Client
– Material UI Client
– Axios Client
Node.js upload/store prototype in MongoDB
We're gonna show y'all how to build this Node.js app step by footstep.
Project Structure
At present look at our project structure:
– config/db.js: includes configuration for MongoDB and Multer (url, database, epitome Bucket).
– views/index.html: contains HTML class for user to upload images.
– routes/alphabetize.js: defines routes for endpoints that is called from views, use controllers to handle requests.
– controllers:
-
dwelling.jsreturnsviews/alphabetize.html -
upload.jshandles upload, store, display and download images
– middleware/upload.js: initializes Multer GridFs Storage engine (including MongoDB) and defines middleware office.
– server.js: initializes routes, configure CORS, runs Express app.
Setup Node.js modules
Open command prompt, alter current directory to the root folder of our project.
Install Limited, CORS, Multer, Multer GridFs Storage and MongoDB with the following control:
npm install express cors multer multer-gridfs-storage mongodb The package.json file will await similar this:
{ "proper noun": "upload-multiple-images-mongodb", "version": "1.0.0", "clarification": "Node.js upload multiple files/images to MongoDB Demo", "primary": "src/server.js", "scripts": { "test": "echo \"Error: no test specified\" && exit one" }, "keywords": [ "node", "upload", "multiple", "files", "images", "mongodb" ], "writer": "bezkoder", "license": "ISC", "dependencies": { "cors": "^ii.eight.5", "express": "^4.17.1", "mongodb": "^four.1.3", "multer": "^1.4.3", "multer-gridfs-storage": "^5.0.2" } } Create View for uploading image
In views folder, create index.html file with the HTML and Javascript code every bit below:
<!DOCTYPE html> <html lang="en"> <head> <meta charset="UTF-viii" /> <meta proper name="viewport" content="width=device-width, initial-calibration=1.0" /> <meta http-equiv="X-UA-Compatible" content="ie=edge" /> <title>Node.js upload images</title> <link rel="stylesheet" href="https://stackpath.bootstrapcdn.com/bootstrap/4.3.1/css/bootstrap.min.css" /> <style> div.preview-images > img { width: 30%; } </style> </head> <body> <div course="container"> <div grade="row"> <div course="col-sm-eight mt-3"> <h4>Node.js upload images - bezkoder.com</h4> <course course="mt-4" activity="/upload" method="POST" enctype="multipart/class-data" > <div course="form-group"> <input type="file" name="file" id="input-files" class="form-command-file border" /> </div> <button type="submit" class="btn btn-primary">Submit</button> </class> </div> </div> <60 minutes /> <div class="row"> <div grade="col-sm-12"> <div form="preview-images"></div> </div> </div> </div> <script src="https://stackpath.bootstrapcdn.com/bootstrap/4.3.i/js/bootstrap.parcel.min.js"></script> <script src="https://code.jquery.com/jquery-3.iv.ane.min.js"></script> <script> $(document).ready(function() { permit imagesPreview = function(input, placeToInsertImagePreview) { if (input.files) { allow filesAmount = input.files.length; for (i = 0; i < filesAmount; i++) { let reader = new FileReader(); reader.onload = function(result) { $($.parseHTML("<img>")) .attr("src", event.target.outcome) .appendTo(placeToInsertImagePreview); }; reader.readAsDataURL(input.files[i]); } } }; $("#input-files").on("change", office() { imagesPreview(this, "div.preview-images"); }); }); </script> </body> </html> For HTML part, we create a form with following elements:
-
action="/upload" -
method="Mail service" -
enctype="multipart/form-data"
You lot also need to notice the input tag with the proper name="file" aspect that we will use in the middleware.
The jQuery script shows preview of the chosen images.
We also apply Bootstrap to brand the UI more comfy to read.
Configure MongoDB database
config/db.js
module.exports = { url: "mongodb://localhost:27017/", database: "bezkoder_files_db", imgBucket: "photos", }; Create middleware for uploading & storing image
Inside middleware folder, create upload.js file with the following code:
const util = require("util"); const multer = crave("multer"); const { GridFsStorage } = require("multer-gridfs-storage"); const dbConfig = require("../config/db"); var storage = new GridFsStorage({ url: dbConfig.url + dbConfig.database, options: { useNewUrlParser: true, useUnifiedTopology: true }, file: (req, file) => { const match = ["image/png", "image/jpeg"]; if (match.indexOf(file.mimetype) === -1) { const filename = `${Date.now()}-bezkoder-${file.originalname}`; return filename; } return { bucketName: dbConfig.imgBucket, filename: `${Date.at present()}-bezkoder-${file.originalname}` }; } }); var uploadFiles = multer({ storage: storage }).single("file"); var uploadFilesMiddleware = util.promisify(uploadFiles); module.exports = uploadFilesMiddleware; – We define a storage configuration object with GridFsStorage class.
-
url: must be a standard MongoDB connexion cord pointing to the MongoDB database.multer-gridfs-storagemodule will create a mongodb connection for you automatically. -
options: customizes how to establish the connection, specified in the MongoClient.connect documentation. -
file: this is the function to control the file storage in the database. The return value of this office is an object with the properties such as:filename,metadata,chunkSize,bucketName,contentType… We also check if the file is an image or non usingfile.mimetype. So we add together the[timestamp]-bezkoder-prefix to the file's original proper name to brand sure that the duplicates never occur in MongoDB collection.bucketNameindicates that the file will be stored atphotos.chunksandphotos.filescollections.
– Adjacent we use multer module to initialize middleware and util.promisify() to brand the exported middleware object tin can be used with async-look.
– The single() function with the parameter is the proper name of input tag (in html view: <input type="file" proper name="file">) will store the unmarried file in req.file.
If you want to practise more, for example, resize the images, please visit this post:
Upload & resize multiple images in Node.js using Limited, Multer, Sharp
Create Controller for the view
controllers/dwelling house.js
const path = crave("path"); const home = (req, res) => { return res.sendFile(path.bring together(`${__dirname}/../views/index.html`)); }; module.exports = { getHome: home }; Create Controller for uploading Images
– For File Upload method, we will export upload() part that:
- use middleware function for file upload
- take hold of Multer fault (in middleware function)
- return response with message
– For Image File Data and Download:
-
getListFiles(): read all files in MongoDB collectionphotos.files, return list of files' information (name, url) -
download(): receives file proper name as input parameter, open download Stream from mongodb built-inGridFSBucket, then response.write(chunk) API to transfer the file to the client.
controllers/upload.js
const upload = require("../middleware/upload"); const dbConfig = require("../config/db"); const MongoClient = require("mongodb").MongoClient; const GridFSBucket = crave("mongodb").GridFSBucket; const url = dbConfig.url; const baseUrl = "http://localhost:8080/files/"; const mongoClient = new MongoClient(url); const uploadFiles = async (req, res) => { effort { await upload(req, res); console.log(req.file); if (req.file == undefined) { return res.transport({ message: "Yous must select a file.", }); } render res.send({ bulletin: "File has been uploaded.", }); } catch (error) { console.log(fault); render res.send({ message: "Mistake when trying upload image: ${error}", }); } }; const getListFiles = async (req, res) => { endeavor { await mongoClient.connect(); const database = mongoClient.db(dbConfig.database); const images = database.collection(dbConfig.imgBucket + ".files"); const cursor = images.discover({}); if ((await cursor.count()) === 0) { return res.status(500).transport({ message: "No files institute!", }); } permit fileInfos = []; await cursor.forEach((md) => { fileInfos.push button({ proper name: physician.filename, url: baseUrl + doc.filename, }); }); render res.status(200).send(fileInfos); } catch (error) { return res.condition(500).send({ message: fault.message, }); } }; const download = async (req, res) => { try { await mongoClient.connect(); const database = mongoClient.db(dbConfig.database); const saucepan = new GridFSBucket(database, { bucketName: dbConfig.imgBucket, }); allow downloadStream = bucket.openDownloadStreamByName(req.params.proper noun); downloadStream.on("data", part (information) { render res.condition(200).write(data); }); downloadStream.on("mistake", function (err) { return res.status(404).ship({ message: "Cannot download the Paradigm!" }); }); downloadStream.on("end", () => { return res.end(); }); } grab (error) { return res.condition(500).send({ message: fault.message, }); } }; module.exports = { uploadFiles, getListFiles, download, }; Define routes
In routes folder, define routes in alphabetize.js with Express Router.
const express = require("express"); const router = express.Router(); const homeController = crave("../controllers/dwelling"); const uploadController = require("../controllers/upload"); let routes = app => { router.get("/", homeController.getHome); router.mail service("/upload", uploadController.uploadFiles); router.get("/files", uploadController.getListFiles); router.get("/files/:proper name", uploadController.download); return app.employ("/", router); }; module.exports = routes; There are 4 routes:
– Get: Dwelling folio for the upload form.
– POST "/upload" to call the uploadFiles function of the controller. This is also for activeness="/upload" in the view.
– GET /files for listing of Images.
– Get /files/:name to download the image with the file name.
Create Limited app server
Finally, we create an Limited server.
server.js
const cors = require("cors"); const limited = require("express"); const app = express(); const initRoutes = require("./routes"); var corsOptions = { origin: "http://localhost:8081" }; app.use(cors(corsOptions)); app.apply(express.urlencoded({ extended: true })); initRoutes(app); allow port = 8080; app.listen(port, () => { console.log(`Running at localhost:${port}`); }); What we practise are:
– import express and cors modules:
- Express is for building the Rest apis
- cors provides Express middleware to enable CORS with various options.
– create an Express app, then add cors middlewares using app.use() method. Find that we prepare origin: http://localhost:8081.
– heed on port 8080 for incoming requests.
Run & Check result
On the project root folder, run this command: node src/server.js
The console shows:
Running at localhost:8080 Open browser with url http://localhost:8080/.
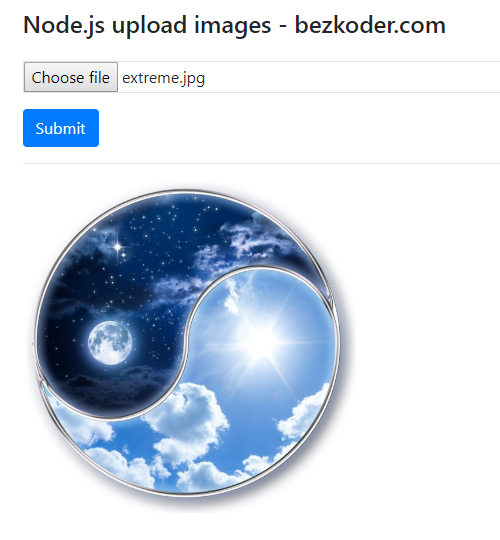
Click on Submit push, if the file is uploaded and stored in MongoDB successfully, the panel shows image's data:
{ fieldname: 'file', originalname: 'farthermost.jpg', encoding: '7bit', mimetype: 'image/jpeg', id: 5dd60e6aee27a520ccad86a0, filename: '1574309482432-bezkoder-extreme.jpg', metadata: null, bucketName: 'photos', chunkSize: 261120, size: 89431, md5: '0d072efbb134b3b186c5da705e0e7059', uploadDate: 2019-11-21T04:11:23.264Z, contentType: 'paradigm/jpeg' } Check MongoDB database, you will see bezkoder_files_db with 2 collections: photos.chunks & photo.files:

Node.js upload/shop multiple images in MongoDB
Now I volition prove you how to modify some lawmaking to bargain with multiple images instead of merely one image at a time.
Change class for uploading multiple images
For the form, we write the input tag with new multiple attribute like this.
views/alphabetize.html
<input type="file" name="file" multiple id="input-files" grade="class-command-file border" /> Modify middleware for uploading & storing image
For multiple images, we utilise another function: array() instead of single().
middleware/upload.js
... // var uploadFile = multer({ storage: storage }).single("file"); var uploadFiles = multer({ storage: storage }).assortment("file", ten); var uploadFilesMiddleware = util.promisify(uploadFiles); module.exports = uploadFilesMiddleware; – array() part limits the number of files to upload each time, the first parameter is the name of – input tag (in html view: <input type="file" proper noun="file">), the second parameter is the max number of files (x).
Controller for uploading multiple images
With the controller, nosotros update the uploadFiles part.
controllers/upload.js
const uploadFiles = async (req, res) => { effort { await upload(req, res); panel.log(req.files); if (req.files.length <= 0) { return res .condition(400) .send({ message: "You must select at least 1 file." }); } return res.status(200).transport({ bulletin: "Files have been uploaded.", }); // console.log(req.file); // if (req.file == undefined) { // return res.send({ // message: "You must select a file.", // }); // } // return res.send({ // message: "File has been uploaded.", // }); } catch (error) { console.log(error); if (mistake.code === "LIMIT_UNEXPECTED_FILE") { render res.condition(400).send({ message: "Too many files to upload.", }); } return res.status(500).send({ bulletin: `Error when trying upload many files: ${fault}`, }); // return res.ship({ // message: "Error when trying upload image: ${mistake}", // }); } }; There is a additional part in the catch() cake. We check if the error.code is "LIMIT_UNEXPECTED_FILE" for showing user the message when he tries to upload more than 10 images/files.
Don't forget to modify the controller method on router:
router.mail("/upload", uploadController.uploadFiles); Run & Check upshot
Run the command: node src/server.js
And the panel shows:
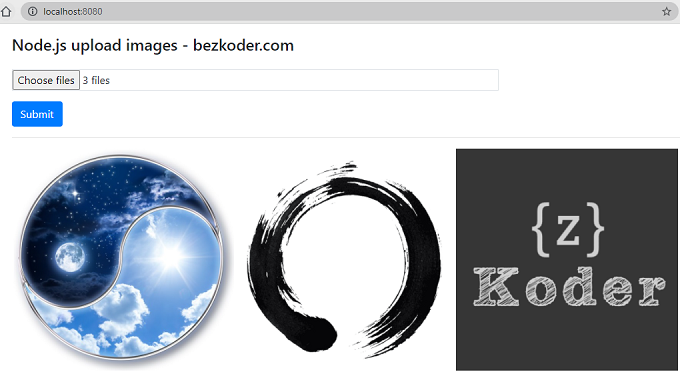
Running at localhost:8080 Open up your browser with url http://localhost:8080/, add some images like this:
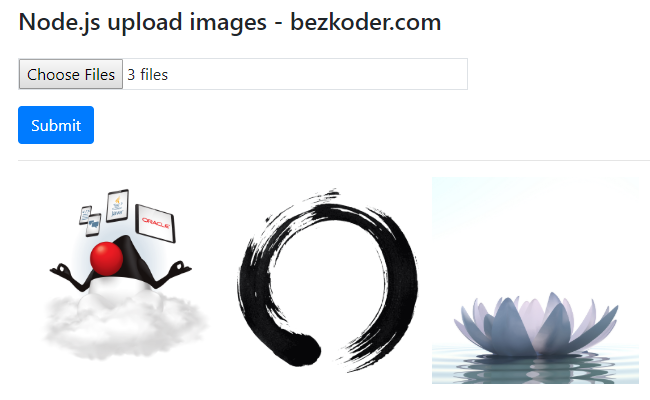
Click on Submit push button. If these images are uploaded and stored in MongoDB successfully, you tin see:

The console shows these images' information:
[ { fieldname: 'multi-files', originalname: 'circle.png', encoding: '7bit', mimetype: 'image/png', id: 5dd637361ae0143fdc572105, filename: '1574319926050-bezkoder-circle.png', metadata: null, bucketName: 'photos', chunkSize: 261120, size: 193593, md5: 'f6455d94e5ec26a1b6eb75b334220cbd', uploadDate: 2019-11-21T07:05:thirty.273Z, contentType: 'image/png' }, { fieldname: 'multi-files', originalname: 'JavaDuke.png', encoding: '7bit', mimetype: 'image/png', id: 5dd637361ae0143fdc572106, filename: '1574319926110-bezkoder-JavaDuke.png', metadata: null, bucketName: 'photos', chunkSize: 261120, size: 112767, md5: 'b7f0fa8ea1932850d99a64b35484484a', uploadDate: 2019-11-21T07:05:30.275Z, contentType: 'image/png' }, { fieldname: 'multi-files', originalname: 'lotus.jpg', encoding: '7bit', mimetype: 'paradigm/jpeg', id: 5dd637361ae0143fdc572107, filename: '1574319926121-bezkoder-lotus.jpg', metadata: null, bucketName: 'photos', chunkSize: 261120, size: 375719, md5: '26dc2e512d7c021daaa7cb46215d4a5b', uploadDate: 2019-xi-21T07:05:32.326Z, contentType: 'image/jpeg' } ] Check MongoDB database:
- photos.files collection:

- chunks.files collection:

If y'all try to upload more ten files at a time, you tin can see the fault like this:

Conclusion
Today nosotros've learned how to upload and store single/multiple images in MongoDB database using limited, multer & multer-gridfs-storage modules, style to limit the number of files by configuration.
We also know how to become list of uploaded files/images, and provide urls for download.
Happy learning! Encounter y'all again.
Further Reading
- https://www.npmjs.com/package/limited
- https://world wide web.npmjs.com/package/cors
- https://www.npmjs.com/package/multer
- https://www.npmjs.com/packet/multer-gridfs-storage
- https://www.npmjs.com/package/mongodb
Node.js & MongoDB Associations:
- MongoDB 1-to-One relationship tutorial with Mongoose example
- MongoDB 1-to-Many Relationship tutorial with Mongoose examples
- MongoDB Many-to-Many Relationship with Mongoose examples
Fullstack Grime App:
- Athwart eight + Node.js Express + MongoDB
- Angular 10 + Node.js Limited + MongoDB
- Athwart 11 + Node.js Express + MongoDB
- Angular 12 + Node.js Limited + MongoDB
- React.js + Node.js Express + MongoDB
- Vue.js + Node.js Limited + MongoDB
Deployment: Docker Compose: Node.js Express and MongoDB example
Source Code
You can find the complete source code for this tutorial at Github.
Source: https://www.bezkoder.com/node-js-upload-store-images-mongodb/
Postar um comentário for "Can You Upload an Svg and Resize It on Front End of Website"